This post may contain affiliate links and we may receive compensation if you purchase products linked to below. As an Amazon Associate, we can earn from qualifying purchases. Please see our Terms and Conditions for details.
On the first day of beginning band the novice trumpet player looks at his or her instrument and asks themselves, “How am I supposed to play this thing?”
That’s where a trumpet fingering chart can help. Unlike a clarinet, a flute or a saxophone, a trumpet has only three valves. And with those three valves the modern trumpet player can produce 38 (or more) notes!
Here we’ll look at what a fingering chart is and how to use them effectively to become a better trumpeter. But before you can use a fingering chart correctly, you’ll need to understand how a trumpet works.
Basics of the trumpet overtone series
Today’s modern piston trumpet has three valves. There are seven different valve combinations, or valve positions:
- Open
- 2nd valve
- 1st valve
- 1st and 2nd valve together
- 2nd and 3rd valve together
- 1st and 3rd valve together
- 1st, 2nd and 3rd valve together
All but the first combination, which doesn’t depress any valves, adds length to the trumpet’s tubing used. Regardless of the length of the tubing, air inside the tube is activated through the vibrations of the lips to produce a natural overtone, or harmonic, series.
The trumpeter can play notes both higher and lower, without changing valve positions, simply by changing the tension of the lips and air speed.
For example, the image below of the first valve combination shows that combination’s overtone series ranging from C below the treble clef staff to C above the treble clef staff. You can reach all the notes in this series just by changing your embouchure and airflow.
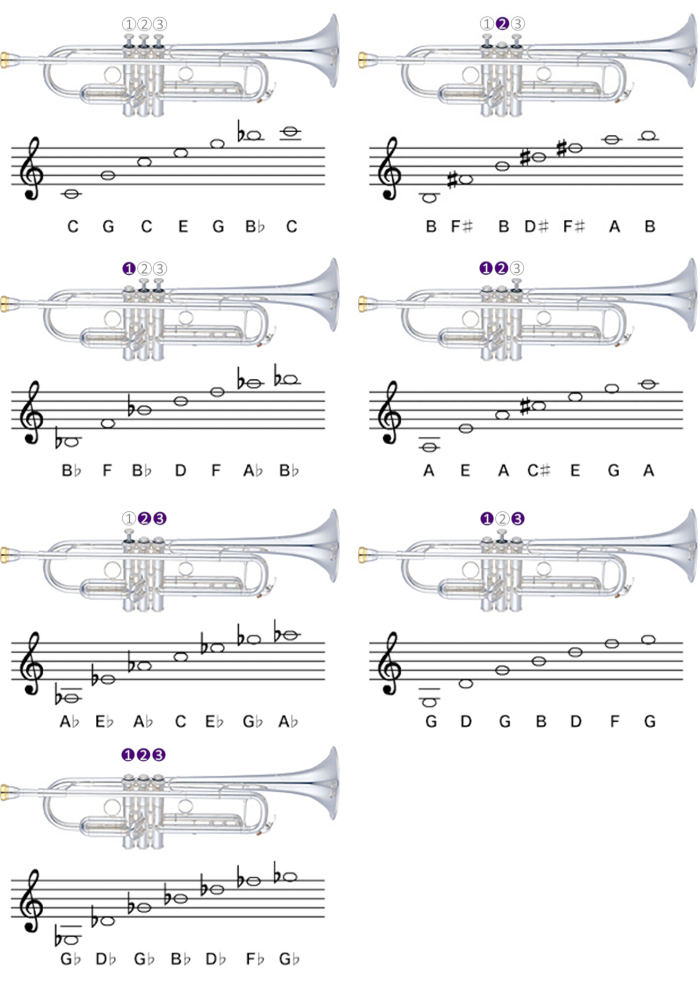
You can start to understand how a trumpet can produce so many different notes with just three valves once you see all seven valve combinations, each with a broad overtone series.
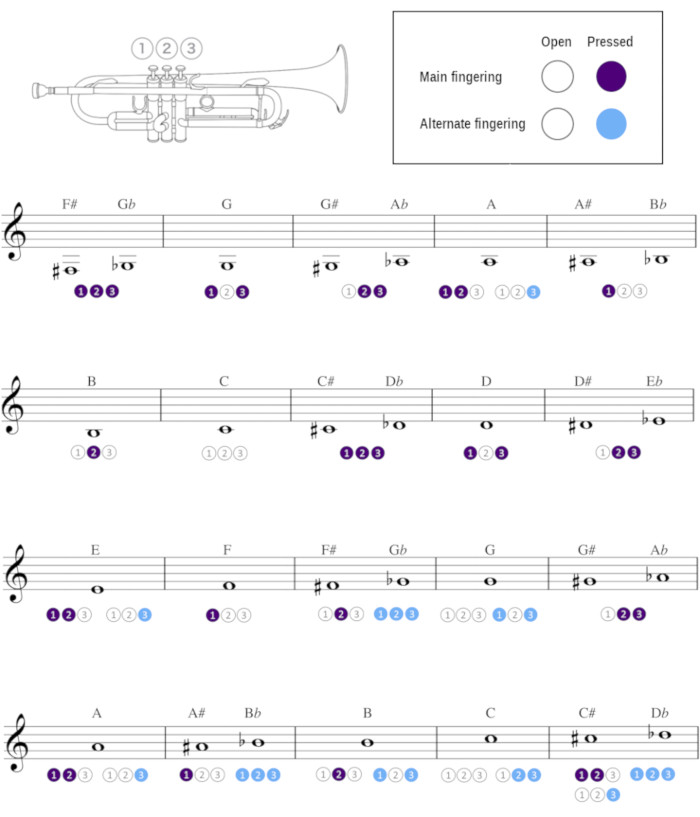
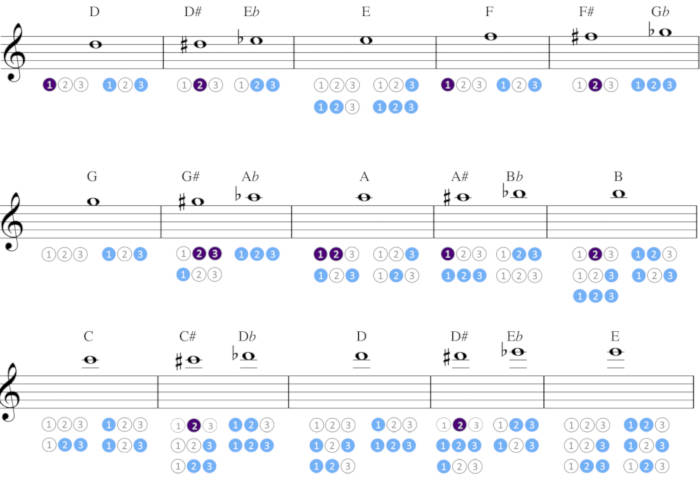
Musicians developed trumpet fingering charts over the years to help trumpeters understand how to play each note. Below is one such chart for the beginner trumpet player. Feel free to download this chart in PDF format. This standard trumpet fingering chart is presented in a chromatic scale from low to high.
Why use a trumpet fingering chart?
Learning and memorizing the proper fingerings can be challenging because each valve position can produce so many different notes. Having a fingering chart as a visual reference to train by can make this process much easier.
Just because you’re attempting to play an A on the staff using the 1st and 2nd valve together doesn’t mean that’s the exact note that will be produced. Playing one way might produce an E, while playing another way might produce a C#.
This is where your muscle memory, ears and brain come into play. Just like learning to play a sport or anything needing complex coordination, practice makes perfect.
Using a fingering guide when you practice
Most beginning method books have a basic fingering chart. This is a good reference for the novice trumpet player.
I recommend keeping a copy of the chart handy when you’re practicing—at least until you’ve internalized all the fingerings. Make a copy and have it on your stand within easy reach so you can look at it when you need to.
Try to remember the fingerings for each note. The sooner you memorize the correct fingering, the less often you’ll need to interrupt playing to look it up.
A tuner will help ensure you’re playing the correct note. There are many models of standalone tuners available on the market and even more tuner apps available for smartphones. My recommendation is TonalEnergy Tuner available in most app stores.
Avoiding a dependence on fingering charts
Remember how inefficient it was to look down at your computer keyboard and search for each letter when you first learned typing? That’s what it’s like when you first learn trumpet fingerings.
And like the labels on the keyboard keys, fingering charts are best used as a guide for trumpet not a crutch keeping you from progressing beyond the basics.
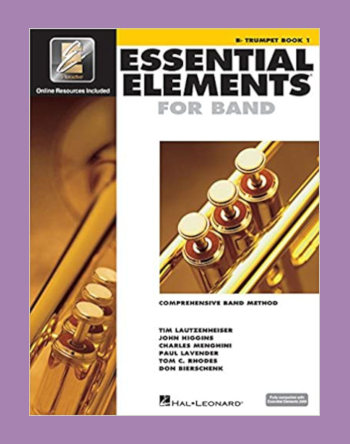
Make sure you’re spending time with a good method book. Essential Elements for Band has a great series of books for trumpet and is widely recommended by music teachers and band directors. These books and others like them can help you master scales and techniques with structured learning and clear presentation.
Learning trumpet notes through repetition and scales
Consistent repetition through playing scales is the best way to train your body, ears and mind to correctly play each trumpet note.
Playing scales can be tedious and boring. But learning them is essential to progressing with the trumpet. And being able to play them correctly every time, without missing a beat, will go a long way toward helping you learn the fingerings and master your instrument.
The first scale most trumpet students learn is the C scale because it has no sharps or flats. From there, they’ll typically add more following “the circle of fifths”, or the chromatic scale. Some scales are harder than others. The more you practice, the easier they’ll become.
Being able to play the chromatic scale from low F# to the C above the staff is a must for any student at any level. The first thing I was asked to play at a recent audition was the chromatic scale from my lowest note to my highest note and then back down.
Alternate fingerings for trumpet
Many notes on the trumpet have alternate fingerings, which can make changing hand positions more efficient in certain pieces of music.
For example, any note you can play in position four (1st and 2nd valve depressed) you can also play with the 3rd valve only. That’s because the combined length of tubing used with the 1st and 2nd valve depressed together roughly equals the length of tubing with the 3rd valve depressed by itself.
This doesn’t mean this alternate fingering is always in tune, so use it sparingly. This use of the 3rd valve instead of 1st and 2nd together is mostly for helping tune with other instruments or to facilitate very rapid passages.
As you play at an increasingly higher range, you’ll find there is more overlap in notes between the seven valve combinations. And with this overlap there are more alternate fingerings.
Just remember, these alternate fingerings are rarely in tune and should generally be avoided. If you do play them, be sure you’re checking a tuner to make sure you’re playing the correct note.
Conclusion
The trumpet has relatively few parts but yet is a complex instrument to operate. There are three valves, seven valve positions and a multitude of notes that can be produced. Learning how to put all this together into a successful performance takes time and patience.
Taking the time to learn your scales and know your fingerings is a major step to becoming a better musician. A trumpet fingering chart will help, and having one nearby when practicing is always a good idea.
Understanding all the notes you can play with each valve combination is a must. Get yourself a tuner and practice with it. Develop a sense of how your body, ears and brain all much work together as one unit to produce the correct note on the trumpet.

