This post may contain affiliate links and we may receive compensation if you purchase products linked to below. As an Amazon Associate, we can earn from qualifying purchases. Please see our Terms and Conditions for details.
Have you ever been frustrated by a trumpet valve sticking?
If you’ve been playing trumpet for more than a few months, chances are you have. And I know the disappointment of having to sit out of band practice or a jam session because you’re not getting a good enough response in one or more valves.
But there are some straightforward ways to troubleshoot sticky valves. In fact, often the causes are easy to spot and address on your own.
Here I’ll walk you through the common causes with instructions on how to fix them and when you may want to consider bringing your horn to a professional instead.
What causes trumpet valve sticking?
A valve can stick for one or more of several reasons. Here are the usual culprits listed roughly in order by most common to least common:

- Normal dryness
- You’re not using a quality valve oil
- The buildup of dirt or other foreign material is inhibiting the valve
- The valve casing is dented and is impinging on the valve
- The valve piston is bent and is scraping against the inside of the valve casing
- The valve stem is bent and is scraping against the inside rim of the top cap
- The related valve slide is bent and is impinging on the valve
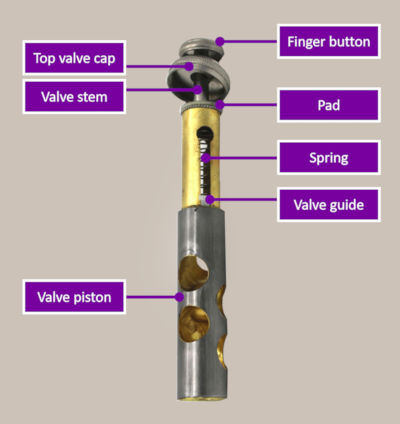
Reviewing the different parts of a trumpet may be helpful if you’re not familiar with all the terminology. If you find your trumpet has one or more stuck valves, chances are it’s due to dryness, inadequate valve oil or foreign material. These three causes account for the vast majority of sticking valves.
How to diagnose and fix a stuck trumpet valve?
It helps to know why your valves are sticking before you start trying to fix them. Some deductive reasoning should reveal the root cause in your particular case. I suggest following each step of the below checklist in order.
1. Oil the valve
Turn the trumpet upside down and add a few drops of valve oil into the valve casing through the hole in the bottom. Any more than 3-4 drops of oil can actually slow the valve response. So don’t use too much.
Turn the trumpet a bit to get the oil to circulate through the inside of the casing and cover the piston.
Then try pressing the valve to see whether it still sticks. If not, the problem was likely normal dryness. And you’ll just need to oil your valves more regularly going forward to prevent it.
2. Wash and oil the valve
Unscrew the top cap and gently pull the valve out. Don’t force it!
If the valve comes out with relative ease, remove the felt pad and spring and set them aside. Getting these parts wet can damage them.
Soak the valve in warm water with a bit of dish soap for 20 minutes. Then set it on a towel to air dry. Avoid wiping the valve with a towel, since this can leave behind hairs or fibers that can cause it to stick again later.
Add 1-2 drops of oil to one side of the valve’s outer surface and another 1-2 drops to the opposite side surface. Then slide the valve back into the casing, screw the top cap back in place and try pressing the valve.
If the valve is working normally again, foreign material, often dirt or a buildup of saliva, was the likely cause for stickiness. Be sure to wash your valves regularly—every couple weeks for daily playing—to prevent this issue from recurring.
Washing and oiling when the valve won’t come out
Sometimes valves get so firmly stuck in place that you can’t remove them without forcing them and risking damage.
If the valve doesn’t slide out smoothly as usual, turn the trumpet upside down, remove the bottom cap and run warm water through the bottom of the casing for a couple minutes.
Note that this will ruin the valve’s felt pad. If you’re not comfortable replacing the pad, check for other possible causes listed below and take the instrument to a professional repair shop if you can’t resolve it yourself.
Then try gently pulling the valve out. If you can get it out, set it aside to air dry and then oil it. If you still can’t remove it, there’s probably another cause at work.
3. Change to a proper valve oil
Always use a decent brand valve oil (related: Best Trumpet Valve Oils: A Complete Guide). Many new trumpets come with oil included. But these stock oils aren’t always effective, especially those you find with budget trumpets priced under $200. I recommend using one of the following valve oils:
| Brand | Photo | Ranking | Where to Buy |
|---|---|---|---|
| Monster Valve Oil |  | Best overall | |
| Al Cass |  | Most popular | |
| MusicNomad MN703 |  | Best on a budget |
Some trumpet players suggest that valve oils can expire after 2-3 years. A standard 2-ounce bottle probably won’t last you that long if you play regularly.
But if you’re using a different oil, or if yours is more than 2 years old, apply a new oil from the above list and see if this solves the problem.
4. Check for dents in the valve casing
Sometimes even a slight collision with a music stand or other hard object can leave a dent in a valve casing and lead to sticking.
First remove all the valves and try different valves in different casings. If multiple valves are sticking in the same casing, you know the problem is casing related.
Remove the valve and look inside the casing for any dents. If you see a dent, note the location and re-install the valve. Press the valve and see if it sticks at the dented point in the casing. If so, the dent is causing the valve to stick.
Dents can be tricky to fix. I recommend taking your instrument to a professional repair shop, rather than attempting to fix it yourself and possibly inflicting more harm. Shops will usually have special mandrels and other tools for doing the job properly.
5. Check for a bend in the valve piston
If the same valve sticks in multiple casings, you know the problem is related to the valve itself. Sometimes a valve can become bent, which can lead to it rubbing against the inside of the casing. This often happens when a trumpet player removes a valve for cleaning and drops it on a hard surface.
Hold the valve piston sideways against a flat surface with light behind it. A table can suffice as your surface so long as you can view the valve at eye level to notice whether it lies completely flat or shows any gaps at either end. Slowly rotate the piston to see if it’s bent.
If the valve is bent, mark the top of the bend with a pencil or dry-erase marker and insert the valve, bottom-first, into the bottom end of a casing until the marked bend reaches the edge. Turn the valve so that the marked bend is facing down, or concave.
Using a soft mallet, firmly tap the upper edge of the valve piston.
Then try sliding the valve in and out of the casing past the bend. It should move more smoothly if you’ve corrected the bend.
If it still sticks, pull the valve out and check again for a bend against a flat surface. You may have caused a new bend in the opposite direction if you tapped the valve too hard. Repeat the process of checking and tapping the valve until it moves smoothly in the casing.
6. Check for a bend in the valve stem
When the valve piston is straight but the valve is still sticking in multiple casings, the valve stem might be bent.
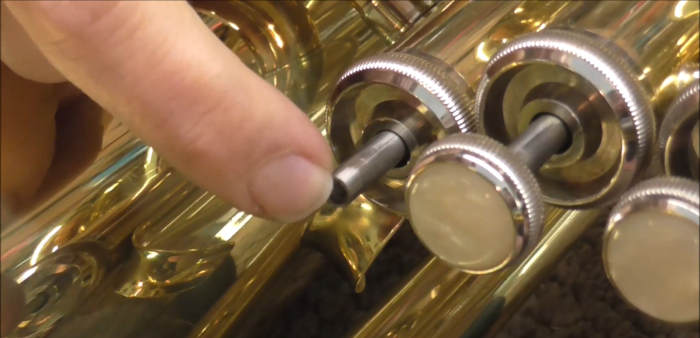
An easy way to check is to remove the finger button to expose the stem, with the valve inside the casing. A normal valve stem will have equal spacing between it and the inside rim of the top valve cap. Whereas a bent stem will lean to one side where it’s catching on the rim and leaving a wider space at the opposite side of the rim.

To correct the stem, grip it with a pair of pliers and carefully bend it back in the opposition direction it’s leaning. Use a rocking motion back and forth, rather than bending it in a single motion, which can cause it to break.
Once the stem appears to have equal spacing between it and the gap, test the valve to confirm it’s working smoothly again.
7. Check whether a damaged slide is impinging on the casing
When a damaged slide is to blame for a sticky valve it’s normally a problem with the second valve slide, since this slide juts out to the side and is the most vulnerable to trauma.
Bumping the second valve slide or subjecting it to other undue force not only often dents the slide, but can also push the inside metal material into the casing, obstructing the valve.
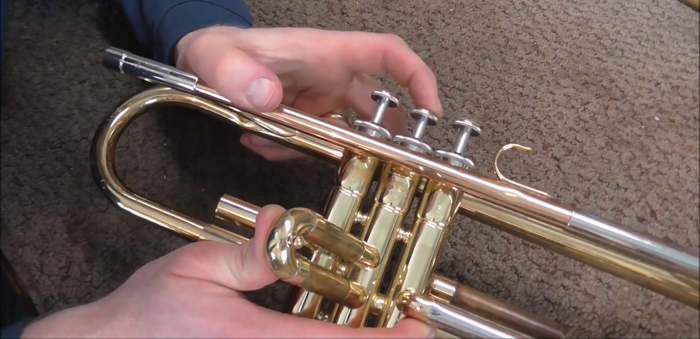
If your valve is stuck with the slide in place, try pulling back slightly on the slide. If the valve releases, the slide is likely the cause for stickiness.
You can often correct this slide issue to free up the valve by pulling back on the slide until it bends slightly at the base. In the case of the shorter second valve slide, it’s easier to control this movement by inserting either the first valve slide or the main tuning slide into the second valve’s position to pull on instead.

You might also find that the problem with the slide is at either the top or bottom position, rather than both. In this case, you can try correcting the affected part individually.
This is another fix that I would generally suggest NOT doing on your own. Depending on the instrument’s workmanship quality, attempting to bend a slide can break the trumpet at the welding seam. This can be an expensive repair, especially if you’re not a welder.
So unless you’re especially confident and experienced with this kind of repair, take it to a professional to avoid further damaging it.
The risks of attempting home trumpet valve repair
Although I’ve already warned you about a couple fixes here for sticky valves, it’s worth repeating in the broader sense: attempt repairing your trumpet valves at your own risk.
Repair shops regularly see instruments damaged at the hands of their owners. Often an owner discovers a minor issue with their trumpet, takes matters into their own hands and does further harm.
The irony is that the trumpet then needs repairs that are several times more expensive than the original problem would have been to fix had the owner brought it to a professional from the start.
Trumpets are fragile. I’ve seen way too many instances of novice repairs gone wrong—from using WD-40 and other alternatives to valve oil, to adding dents and breaking parts off an instrument through rough handling.
So, please, unless you’re working with a budget horn that will cost more than it’s worth to professionally repair, if you have doubts about your repair skills, take your trumpet to a professional.
Conclusion
We’ve covered a lot of ground here in revealing most of the common ways that cause trumpet valve sticking, as well as solutions. I hope this guide has given you the knowledge to diagnose, and in some cases fix, any stuck valves on your horn.
A simple oiling or cleaning is usually all it takes to resolve these. But if these don’t work, and you discover structural damage that’s causing a valve to stick, I hope you’ll consider whether you can fix this on your own or had better bring the trumpet to a repair shop.
What successes (or failures) have you experienced repairing a trumpet? Tell us about them in the comments section below!
Hello Terrance my name is Chris. I’m having some trouble with my trumpet. I’ve been moving around alot and haven’t had the time to look after my trumpet for a while now. Recently I wanted to clean it up but my 2nd&3rd values were stuck. I managed to get them out without damaging either one and clean them, including the trumpet. After cleaning and applying the grease and value oil i wnet ahead and put back in and they were still sticking. Not as hard as before but still not where I want it to be. I haven’t noticed anything damages or starches to the values or trumpet so I don’t know what’s wrong. If you can give me some advice about what wrong and what I can do that would be greatly appreciated.
Thanks for your question, Chris.
From your description, it sounds like you’ve taken initial steps to address the sticking valves. Make sure you’re using high-quality valve oil, as subpar or old oil can contribute to sticking. If after re-oiling, the issue persists, check the valve casing for dents and the valve piston and stem for bends. If you’re still facing challenges, consider taking your trumpet to a professional. It’s hard to for me to give a clear diagnosis without seeing the horn first hand.
Your oiling method of putting oil in the bottom of the valve, while convenient, does not completely spread the oil effectively.
Also sticking valve can be caused by faulty finger technique. Placing the fingers improperly and not pushing the valve straight down can cause sticking.
Thanks for your comment, John. We typically prefer this message of oiling valves to minimize how often we remove the pistons. Though we obviously need to remove them each time we do a proper cleaning, the more we remove the pistons the greater chance there is of adding wear and tear to them. We cover this and the more mainstream technique of oiling trumpet valves in another article for anyone who’d like more detail.
Also, you make a good point with regard to preventing sticky valves–proper playing technique is key to avoiding this type of problem.
If you need to use the warm water trick and the finger buttons unscrew, just take off the felt pad to avoid wrecking it
Strangest problems with my second valve. I removed it yesterday and today noticed the horn pressure was wrong. So I started removing valves to see which one I had turned backwards. But the second valve won’t come out. It moves up and down just fine. No friction. But it just won’t come out the top. The other valves were turned the right way so I’m assuming this one is turned wrong. Searching for stuck valve only returns results for when a valve won’t move. This issue seems unique. Any thoughts?